
A solar panel installation diagram serves as a blueprint for setting up solar systems, illustrating components like panels, inverters, and batteries. It guides installers through wiring configurations, ensuring efficiency and safety.
Importance of Solar Panel Diagrams for Installation
Solar panel installation diagrams are essential tools for ensuring a safe and efficient setup of solar energy systems. They provide a clear visual guide, helping installers understand the layout and connections between components like panels, inverters, and batteries. These diagrams are crucial for identifying potential issues before installation, reducing errors, and saving time. They also ensure compliance with electrical and safety standards, minimizing risks during and after installation. By following a detailed diagram, installers can optimize system performance and ensure reliability. Additionally, diagrams aid in troubleshooting and future upgrades, making them indispensable for both novice and experienced installers. Their role in planning and executing a successful solar installation cannot be overstated.
Overview of Solar Panel System Components
A solar panel system consists of several key components, each playing a vital role in energy generation and distribution. Solar panels, made up of photovoltaic cells, convert sunlight into electricity. An inverter is essential for converting the DC power generated by the panels into AC power, which is usable for household appliances. A battery storage system allows excess energy to be stored for later use, especially during power outages or at night. Mounting hardware secures the panels to rooftops or ground-mounted structures, ensuring stability and optimal positioning. Charge controllers regulate the flow of energy to prevent overcharging of batteries. Finally, a monitoring system tracks the system’s performance, providing insights into energy production and usage. Together, these components form a comprehensive solar energy system tailored to meet specific energy needs.
Understanding Solar Panel Wiring Diagrams
Solar panel wiring diagrams are blueprints showing how panels, inverters, and batteries connect. They guide series and parallel configurations, ensuring efficient energy flow and safe installation practices.
Basics of Solar Panel Wiring Configurations
Solar panel wiring configurations determine how panels are connected to maximize energy production. The two primary setups are series and parallel wiring. Series connections increase system voltage, ideal for charging batteries, while parallel configurations boost current output, suitable for powering appliances directly. These setups ensure efficient energy flow and system compatibility. Proper wiring is crucial for safety and performance, requiring tools like charge controllers and inverters to regulate power. Diagrams provide clear visual guidance, helping installers avoid errors. Understanding these configurations is essential for designing systems tailored to specific energy needs. Correct wiring ensures optimal performance, safety, and longevity of the solar panel system.
Series vs. Parallel Wiring: Pros and Cons
Solar panel wiring can be configured in series or parallel, each offering unique advantages. Series wiring increases system voltage, making it ideal for charging batteries efficiently, but a single underperforming panel can reduce overall output. Parallel wiring, on the other hand, increases current output and provides more flexibility, as panels can operate independently. Series setups are simpler but less fault-tolerant, while parallel systems are more complex but offer better redundancy. Understanding these configurations is crucial for optimizing energy production and system reliability. Diagrams often highlight these differences, helping installers choose the best configuration for specific applications. Proper selection ensures maximum efficiency, safety, and long-term performance of the solar panel system.
How to Read a Solar Panel Wiring Diagram
Reading a solar panel wiring diagram involves understanding its visual representation of the system’s electrical connections. Start by identifying the components, such as solar panels, inverters, batteries, and charge controllers. Trace the flow of electricity from the panels through the wiring to the inverter and battery bank. Pay attention to symbols and labels, which indicate positive and negative connections. Series and parallel wiring configurations are often highlighted, showing how panels are connected to optimize voltage and current. Verify that all connections match the diagram’s layout and ensure proper grounding for safety. Familiarize yourself with universal symbols for solar components to interpret the diagram accurately. By following the diagram step-by-step, you can ensure a safe and efficient solar panel installation.

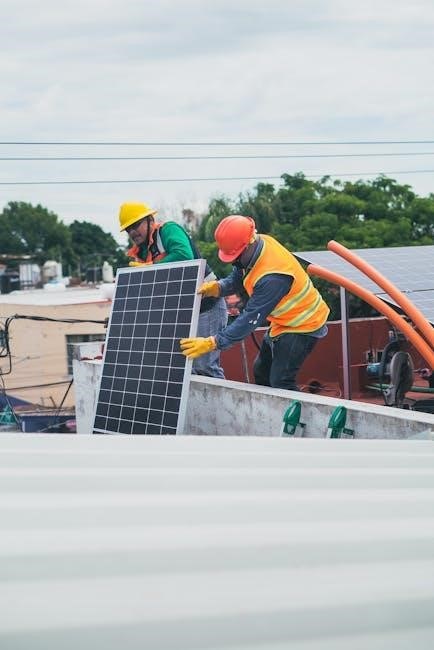
Solar Panel Installation Process
The solar panel installation process begins with site assessment and system design, followed by physical installation and wiring. Diagrams guide installers through each step, ensuring safety and efficiency.
Step-by-Step Guide to Installing Solar Panels

Installing solar panels involves several key steps. First, assess the site for solar potential and ensure it is free from shading. Next, design the system using a solar panel installation diagram to map out components and connections. Mount the solar panels securely on the roof or ground, ensuring they are evenly spaced and angled correctly for maximum sunlight exposure. Connect the panels in series or parallel, following the wiring configuration outlined in the diagram. Install the inverter and battery, ensuring proper integration with the solar array. Finally, test the system to ensure all components function efficiently and safely.
Tools and Materials Required for Installation
Installing solar panels requires specific tools and materials. Essential tools include a drill, screwdrivers, wrenches, and wire cutters for handling electrical connections. A ladder or lift is necessary for rooftop installations. Materials needed are solar panels, mounting hardware like rails and brackets, inverters, batteries, and wiring. Safety gear such as gloves and safety glasses is crucial. A solar panel installation diagram PDF provides a detailed list of components and tools, ensuring nothing is overlooked. Proper preparation of these tools and materials is essential for a smooth and efficient installation process, minimizing errors and ensuring system reliability. Always refer to the diagram to confirm compatibility and specifications of each item before starting the installation.
Safety Precautions During Solar Panel Installation
Safety is paramount during solar panel installation. Always wear personal protective equipment, including gloves, safety glasses, and a harness when working at heights. Ensure the system is disconnected from power sources before handling electrical components. Use non-conductive tools to avoid shocks, and keep fire extinguishers nearby. Check the structural integrity of the installation site to prevent collapses. Follow local building codes and manufacturer guidelines. Be cautious of sharp panel edges and avoid overreaching. Never work under unsafe weather conditions, such as rain or extreme heat. Properly ground equipment to prevent electrical hazards. Regularly inspect tools and materials for damage. Training and experience are essential for safe installations. If unsure, consult a professional to ensure compliance with safety standards and regulations.
Advanced Solar Panel Diagrams and Configurations
Advanced solar diagrams showcase complex PV configurations, optimizing energy output and system scalability. They detail inverter integration, battery systems, and monitoring networks for efficient performance and reliability.
Understanding PV Array Configurations
Photovoltaic (PV) array configurations are critical for maximizing solar energy production. A PV array consists of multiple solar panels connected in series or parallel to achieve desired voltage and current levels. Series connections increase voltage, while parallel connections boost current. Understanding these configurations is essential for system design, as they directly impact energy output and compatibility with inverters and batteries. Proper configuration ensures optimal performance, especially under varying conditions like shading or temperature changes. Advanced diagrams detail stringing strategies, module orientations, and spacing to minimize energy loss. They also highlight monitoring systems to track performance and identify inefficiencies. By analyzing PV array configurations, installers can tailor systems to specific energy needs and environmental conditions, ensuring efficient and reliable power generation. Accurate configurations are vital for both residential and commercial solar setups, ensuring safety and maximizing return on investment.
Inverter and Battery Integration in Diagrams
Solar panel installation diagrams detail the integration of inverters and batteries, essential for converting and storing solar energy. Inverters convert DC power from panels to AC for household use, while batteries store excess energy for later consumption. Diagrams illustrate how these components connect, ensuring seamless energy flow. They show wiring between panels, inverters, and batteries, highlighting voltage and current requirements. Proper integration is crucial for system efficiency and reliability. Advanced diagrams include charge controllers and monitoring systems, optimizing energy storage and usage. Battery bank configurations, such as series or parallel setups, are also detailed to match energy needs. Accurate integration ensures safety, maximizes energy efficiency, and supports grid independence, making these diagrams indispensable for both installers and system designers. They provide a clear roadmap for building scalable and efficient solar power systems tailored to specific energy requirements.
Monitoring and Control Systems in Solar Diagrams
Solar diagrams often include monitoring and control systems to track and manage energy production. These systems use sensors and software to monitor voltage, current, and power output in real-time. Diagrams detail how data loggers connect to panels, inverters, and batteries, providing insights into system performance. Control systems, such as maximum power point tracking (MPPT) chargers, optimize energy harvest and ensure efficient battery charging. Monitoring tools also detect faults or inefficiencies, enabling prompt troubleshooting. Remote monitoring capabilities allow users to track system performance via smartphones or computers. These systems enhance energy efficiency, reliability, and user experience, making them a critical part of modern solar installations. They ensure optimal energy use and provide data-driven insights for system maintenance and upgrades. Advanced diagrams may include automation features for load management and energy storage optimization, further improving system functionality and user convenience.
Custom Solar Panel Diagram Creation
Custom solar diagrams allow tailored system designs, ensuring optimal performance for specific energy needs. They use specialized software to create precise layouts and wiring configurations for unique setups.

Software Tools for Designing Solar Diagrams
Various software tools are available for creating detailed solar panel diagrams, such as AutoCAD, SketchUp, and specialized PV design platforms. These tools enable users to draft precise layouts, including panel placements, wiring configurations, and system components. They often include libraries of solar equipment, making it easier to represent real-world components accurately. Some programs, like Helioscope or PV SOL, are specifically designed for solar installations, offering features like shading analysis and performance predictions. These tools are essential for both professionals and DIY enthusiasts, ensuring that solar systems are designed efficiently and safely. By using these software solutions, users can customize their diagrams to meet specific energy needs and installation requirements, ensuring optimal performance and compliance with technical standards.
How to Create a Solar Panel Diagram for Your System
Creating a solar panel diagram involves outlining your system’s components and their connections. Start by identifying the panels, inverters, batteries, and mounting hardware. Use software tools like AutoCAD or specialized PV design programs to sketch the layout. Begin with the solar array, illustrating panel placement and wiring configurations. Next, add the inverter and battery connections, ensuring correct polarity and circuit paths. Include labels and annotations for clarity. Consider shading effects and optimal panel angles to maximize efficiency. Finally, review the diagram for accuracy and compliance with safety standards. This visual guide ensures a clear understanding of your solar system’s setup, aiding in installation and troubleshooting. Regular updates to the diagram are recommended as your system evolves or components are added. A well-designed diagram is crucial for maintaining and optimizing your solar energy system over time. It serves as a reference for future modifications and ensures all components function harmoniously.